29 janvier 2025
Universal App with Expo

4 minutes reading

Universal App with Expo
Over the years, Expo has significantly enhanced its range of features, becoming a viable solution for developing multi-platform applications. In this article, we will explore the creation of a universal application.
What is a Universal Application?
A universal application is one where a single code base is used to create an application that can be run on several platforms. Typically, these are web, iOS, and Android platforms, but it could also include others like Windows, macOS, etc. The key advantage of this approach is that it reduces the time required for development and maintenance, as maintaining multiple code bases is not necessary.
Why a Universal Application?
In general, the introduction of a web export often occurs for apps primarily developed for mobile platforms. The idea is to offer a similar experience on a web browser, without needing to develop a full-fledged web app. This is the case, for example, with BlueSky. It's worth noting that it's possible to adapt components for specific web usage through platform-specific file extensions.
Why Use Expo?
Beyond being an SDK for mobile apps, Expo provides all the necessary tools to quickly start a universal application due to its integration of React Native Web. Accompanied by EAS, deploying an Expo app across all platforms becomes a breeze, especially since the public preview release of EAS Hosting.
What Technical Stack?
For this example, we'll use the following tech stack:
The choice of Tamagui is driven by its ease of use, its well-stocked component library, and above all, its web compatibility, particularly with the compilation of CSS style sheets at build time.
Creating and Configuring the Project
Let's start by creating a new Expo project:
bunx create-expo-app my-universal-app
cd my-universal-app
Next, let's add the external dependencies that are not installed by default:
bun add tamagui @tamagui/config @tamagui/babel-plugin
Create a configuration file for Tamagui as follows:
import { defaultConfig } from "@tamagui/config/v4";
import { createTamagui } from "tamagui";

export const config = createTamagui(defaultConfig);

type CustomConfig = typeof config;

declare module "tamagui" {
  interface TamaguiCustomConfig extends CustomConfig {}
}
Then, let's add the Tamagui Babel plugin to our babel.config.js file:
module.exports = {
  presets: ["babel-preset-expo"],
  plugins: ["@tamagui/babel-plugin"],
};
Creating the First Page
Remove the default files in the app folder. For the +not-found.tsx file, we'll simply return null. Let's modify our _layout.tsx:
import { useColorScheme } from "@/hooks/useColorScheme";
import { config } from "@/tamagui.config";
import {
  DarkTheme,
  DefaultTheme,
  ThemeProvider,
} from "@react-navigation/native";
import { Stack } from "expo-router";
import { StatusBar } from "expo-status-bar";
import "react-native-reanimated";
import { TamaguiProvider } from "tamagui";

export default function RootLayout() {
  const colorScheme = useColorScheme();

  return (
    <TamaguiProvider
      config={config}
      defaultTheme={colorScheme === "dark" ? "dark" : "light"}
    >
      <ThemeProvider value={colorScheme === "dark" ? DarkTheme : DefaultTheme}>
        <Stack>
          <Stack.Screen name="index" options={{ headerShown: false }} />
          <Stack.Screen name="+not-found" />
        </Stack>
        <StatusBar style="auto" />
      </ThemeProvider>
    </TamaguiProvider>
  );
}
Then create a index.tsx file:
import { H1, Stack } from "tamagui";

const HomePage = () => {
  return (
    <Stack justify="center" items="center" flex={1}>
      <H1>Universal app example</H1>
    </Stack>
  );
};

export default HomePage;
Running the Application
To run the application, execute the following command:
bun start
The Metro bundler used by Expo will launch. You can then press either w to launch the web application, i to launch the iOS application, or a to launch the Android application.
Adding an API Route
With version 3 of Expo Router, it's possible to expose API routes, similar to what Next.js does. We will create an API route /hello, which will return a simple message in a JSON:
export const GET = () => {
  return Response.json({ message: "Hello from API" });
};
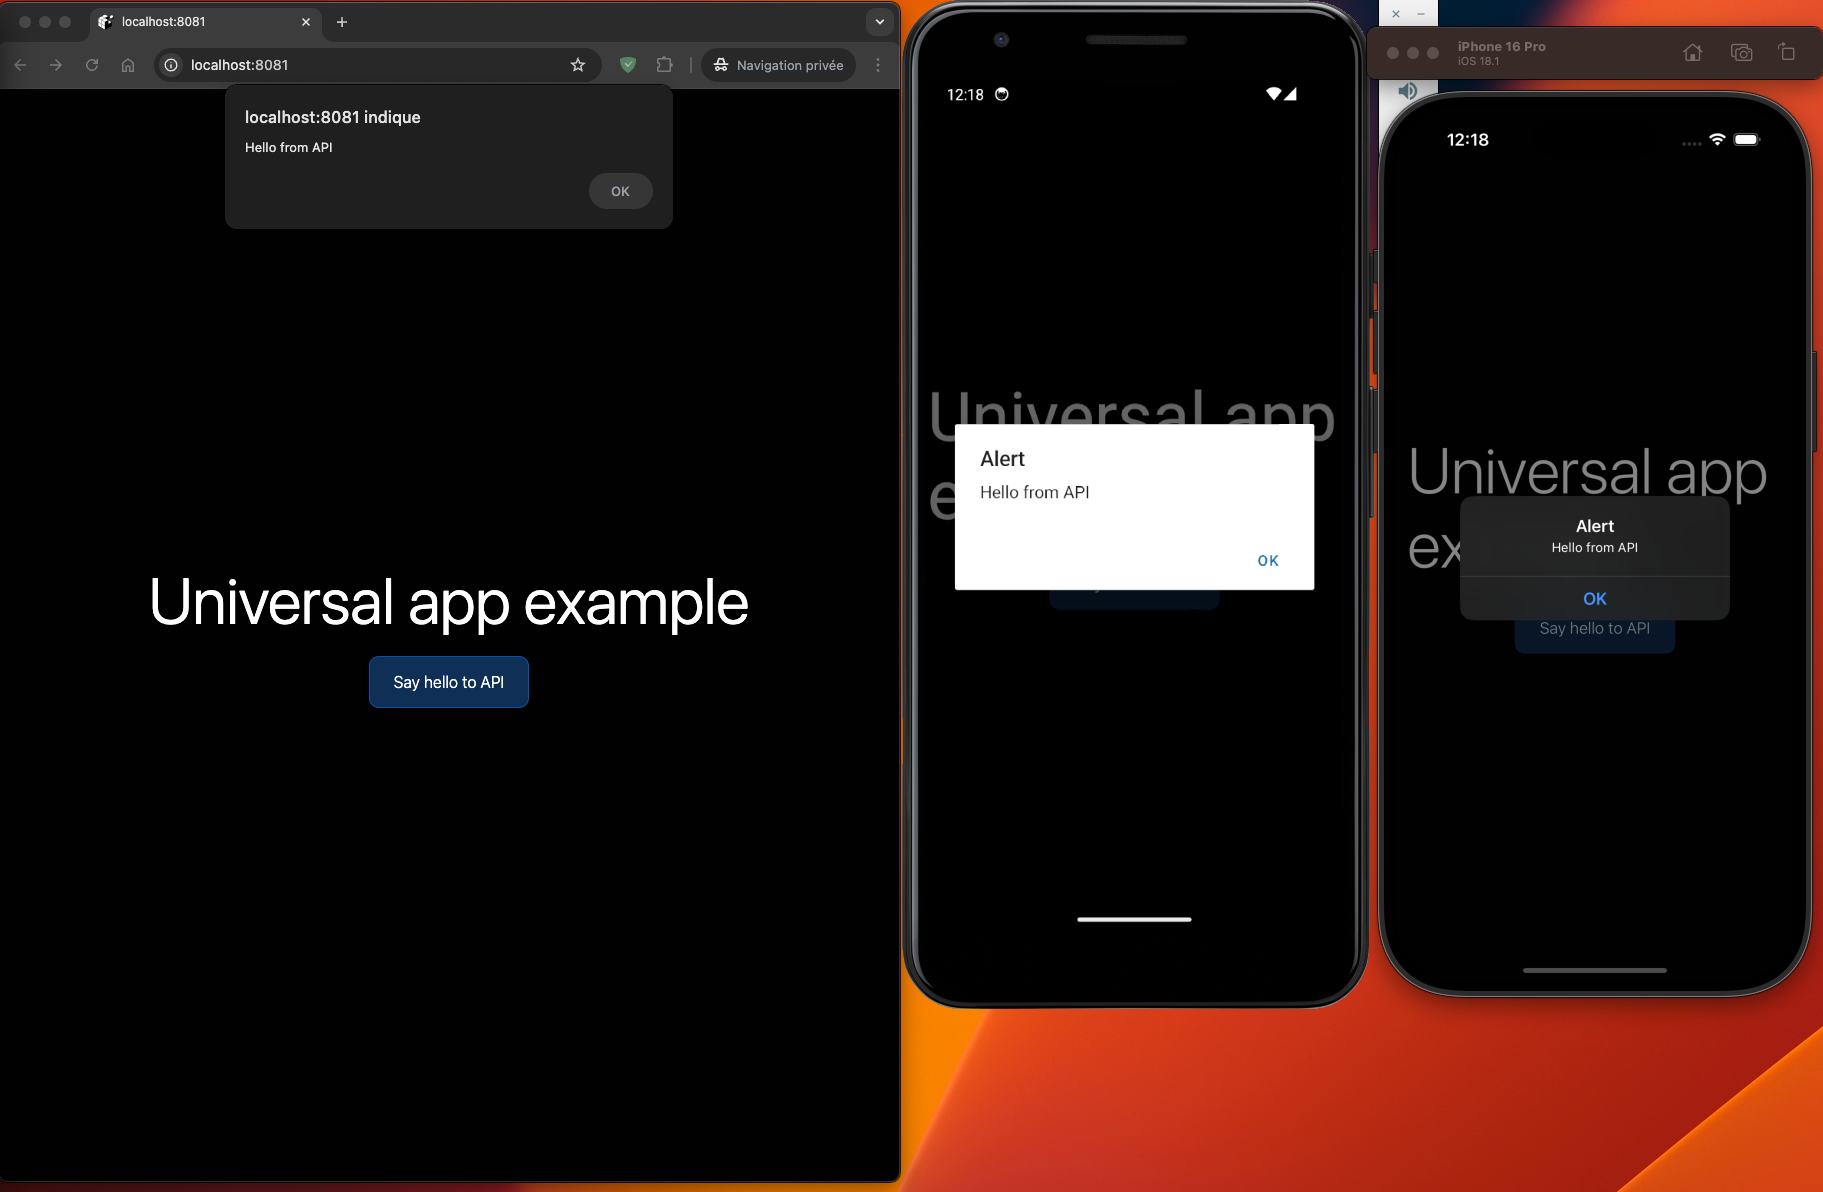
Let's modify our index.tsx file to add a button that will call our API route:
import { Button, H1, Stack } from "tamagui";

const HomePage = () => {
  const onSayHello = async () => {
    const response = await fetch("/hello");

    if (response.ok) {
      const json = await response.json();
      alert(json.message);
    } else {
      alert("Error");
    }
  };

  return (
    <Stack justify="center" items="center" flex={1} gap="$4">
      <H1>Universal app example</H1>
      <Button theme="blue" size="$5" onPress={onSayHello}>
        Say hello to API
      </Button>
    </Stack>
  );
};

export default HomePage;
You need to modify the expo.web.output property with the server value in the app.json file
to use the API routes.
There you have it! In just a few minutes, we set up a universal application with Expo, and even exposed an API route.
Deployment
Before deploying to a remote server, you can test the web application locally by executing the following command:
npx expo export -p web
npx expo serve
To deploy the application on a remote server, we'll use EAS Hosting:
npx expo export -p web
eas deploy
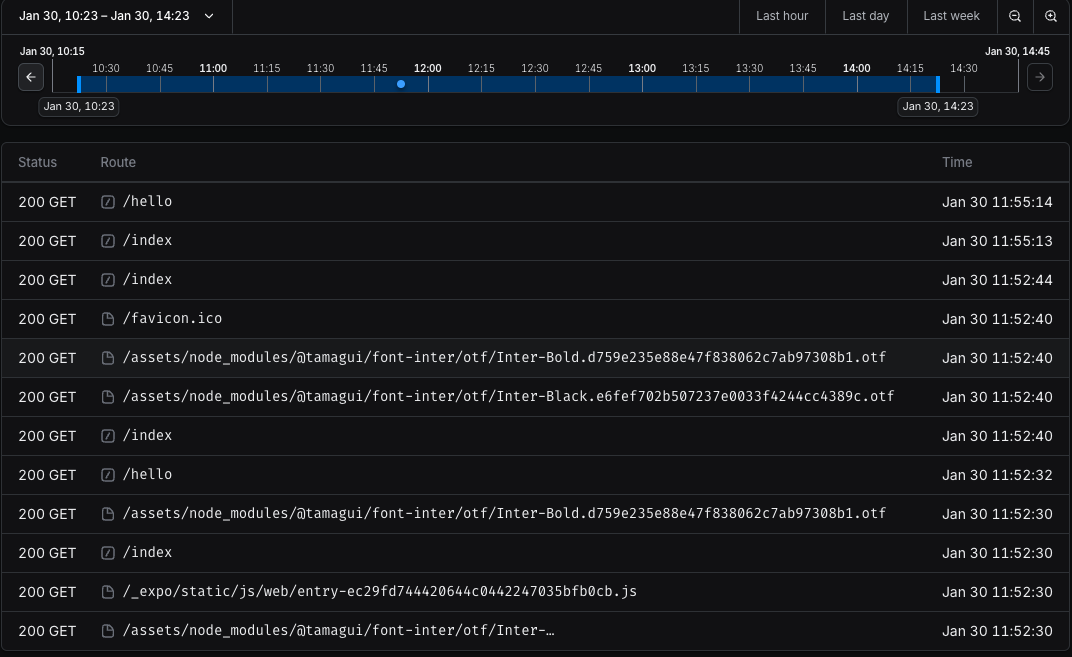
And there you have it! The application is now accessible on the web. A dashboard is available on EAS where you can view the incoming requests, similar to Vercel.
Conclusion
Expo is an increasingly mature solution for the development of universal applications. Thanks to EAS, deploying an Expo application on all platforms becomes child's play. Tamagui makes it quick to create a compatible interface across all platforms, all optimized for performance.
However, it should be taken into account that currently, the web export is a SPA, so there's no server-side rendering as you might have with Next.js. To this day, this feature is at the experimental stage and may be introduced in a future version. Meanwhile, if you want to use Next.js, opting for a monorepo is recommended. This is what is used in the Tamagui base template.