26 septembre 2024
Anatomy of a React Component: A Visual Explanation

3 minutes reading

This article aims to explain in a clear and visual way how a React component works.
Whether you're a beginner or just curious to learn more about the inner workings of this library, we will explore together the different steps that allow a component to react to data and manage its state. Let's get started!
The Component
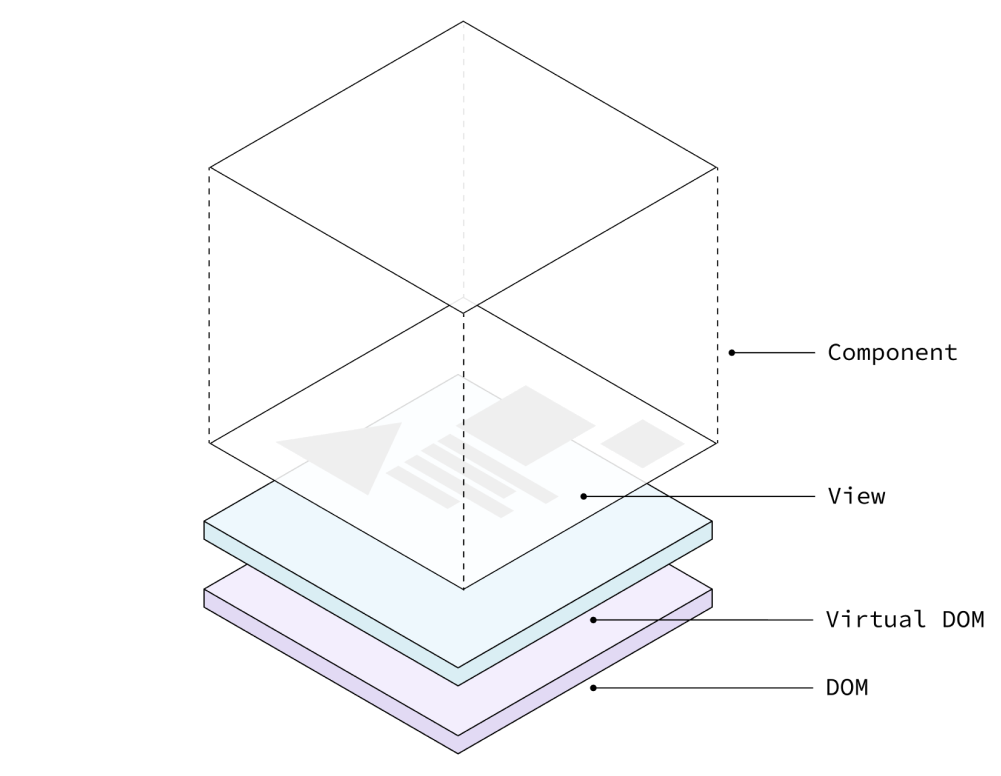
At the heart of a React project, everything starts with a component. This can be represented as a simple box, isolated from the rest of the application.
At this stage, no state or external data interacts with it. It simply renders a view based on the code provided. This is the base, the skeleton: a simple cube ready to receive instructions.
Under this static view lies the virtual DOM. This internal React mechanism tracks changes in the page structure without directly affecting the real DOM, thus avoiding costly performance operations.
const Component = () => {
  return <div>Hello World</div>
}
Adding Props

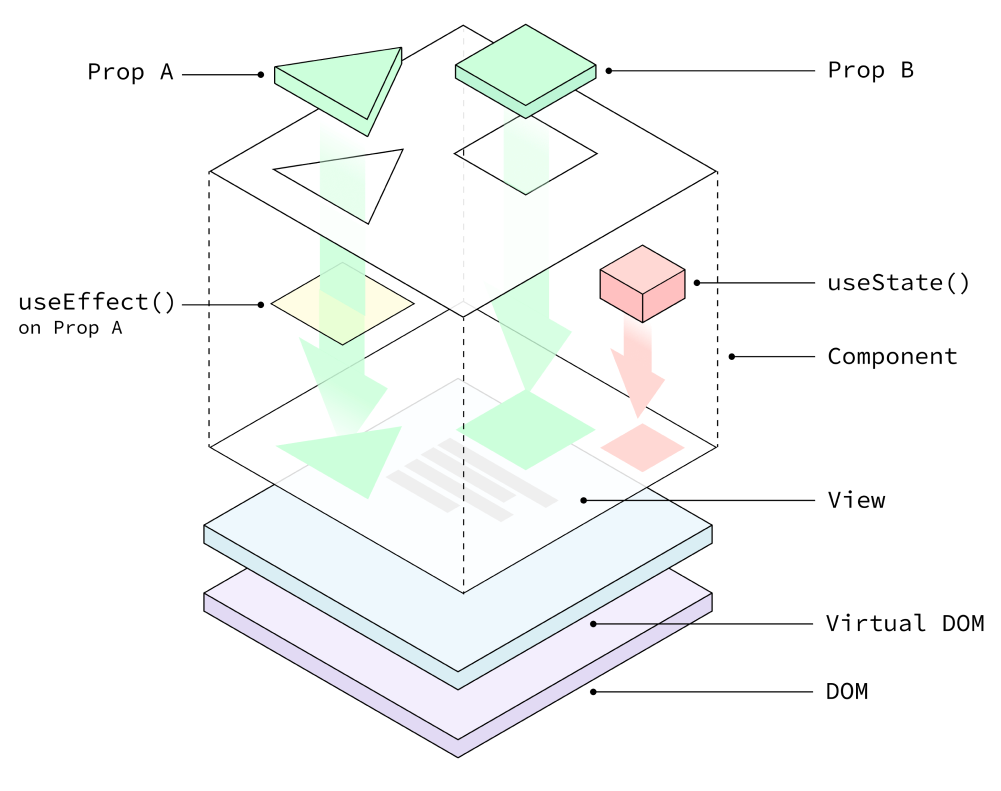
The next step in the life of a component is the injection of props. These are data passed to the component to indicate what to display or how to behave. In the image, we see green arrows indicating the arrival of props "Prop A" and "Prop B". These data can come from anywhere in the application but are often derived from parent components.
Props are essentially the fuel of a functional component, allowing it to produce a dynamic view. However, at this stage, the component remains a memoryless entity: it simply receives instructions from the outside and displays the view accordingly.
const Component = ({ propA, propB }) => {
  return (
    <div>
      Hello {propA} and {propB}
    </div>
  )
}
State with useState

Props alone are not always enough. If a component needs to remember internal information and react accordingly, this is where state (managed here with the useState hook) comes in. In the image, a red box appears in the component, symbolizing this internal data.
State is crucial: it allows the component to have local memory, storing values that can change over time, like the number of items in a cart or a checked checkbox.
The arrows show that the state directly influences the view. As soon as the state changes, React updates the virtual DOM, which reflects the changes without immediately touching the real DOM, ensuring smoothness and performance.
const Component = ({ propA, propB }) => {
  const [count, setCount] = useState(0)

  return <div> Hello {propA}, {propB and {count}</div>
}
Synchronization with the Outside via useEffect
A component does not live in isolation. For it to interact with the outside world (for example, by fetching data from an API), React offers the useEffect hook. This allows the component to synchronize with an external source, responding to changes in props or state.
In the image, a yellow arrow shows the update of the component in response to a change in prop. This means that as soon as Prop A changes, the useEffect hook triggers an action. This mechanism is fundamental for orchestrating asynchronous behaviors or side effects.
const Component = ({ propA, propB }) => {
  const [count, setCount] = useState(0)

  useEffect(() => {
    console.log(`${count} changed!`)
  }, [count])

  return (
    <div>
      Hello {propA}, {propB}and {count}
    </div>
  )
}
Optimization with memo

When components are numerous and interact with each other, it becomes crucial to minimize unnecessary re-renders. The React memo function allows a component to render only if its props change. Thus, if the props remain the same, React does not re-evaluate the component, optimizing performance.
In the last image, we see that memo protects the component from unnecessary re-renders. Only significant changes will trigger an update. This optimization is essential in complex interfaces where performance is crucial.
const Component = memo(({ propA, propB }) => {
  const [count, setCount] = useState(0)

  useEffect(() => {
    console.log(`${count} changed!`)
  }, [count])

  return (
    <div>
      Hello {propA}, {propB}and {count}
    </div>
  )
})
Conclusion
So here’s an introduction to React components and their different mechanisms!
It's interesting to note that the use of memo might soon become redundant. Indeed, with the upcoming React 19 version, the compiler will be capable of performing these optimizations automatically, rendering this step unnecessary in many cases.
An evolution that promises to further simplify the development of React applications.
👋