11 octobre 2024
Manage notifications in a WebView with React Native

11 minutes reading
In this article, we will explore how to set up a notification system within a React Native application using a WebView.
This article follows a previous article on React Native WebViews. If you're not familiar with WebViews, you can familiarize yourself with their operation by consulting this article. The main goal here is to use the concepts discussed previously to set up a notification system.
For this, we will use the react-native-webview package and the notification service Firebase Cloud Messaging (FCM).
Stay connected with your users
Easily applicable to all kinds of projects, notifications are a highly effective communication method. They allow you to stay connected with users, inform them about new features, promotions, actions, etc.
Firebase Cloud Messaging
Firebase Cloud Messaging (FCM) is a cross-platform messaging service that allows you to send notifications at no additional cost. You can target users by channels, by devices, by groups, etc.
Fundamental concepts
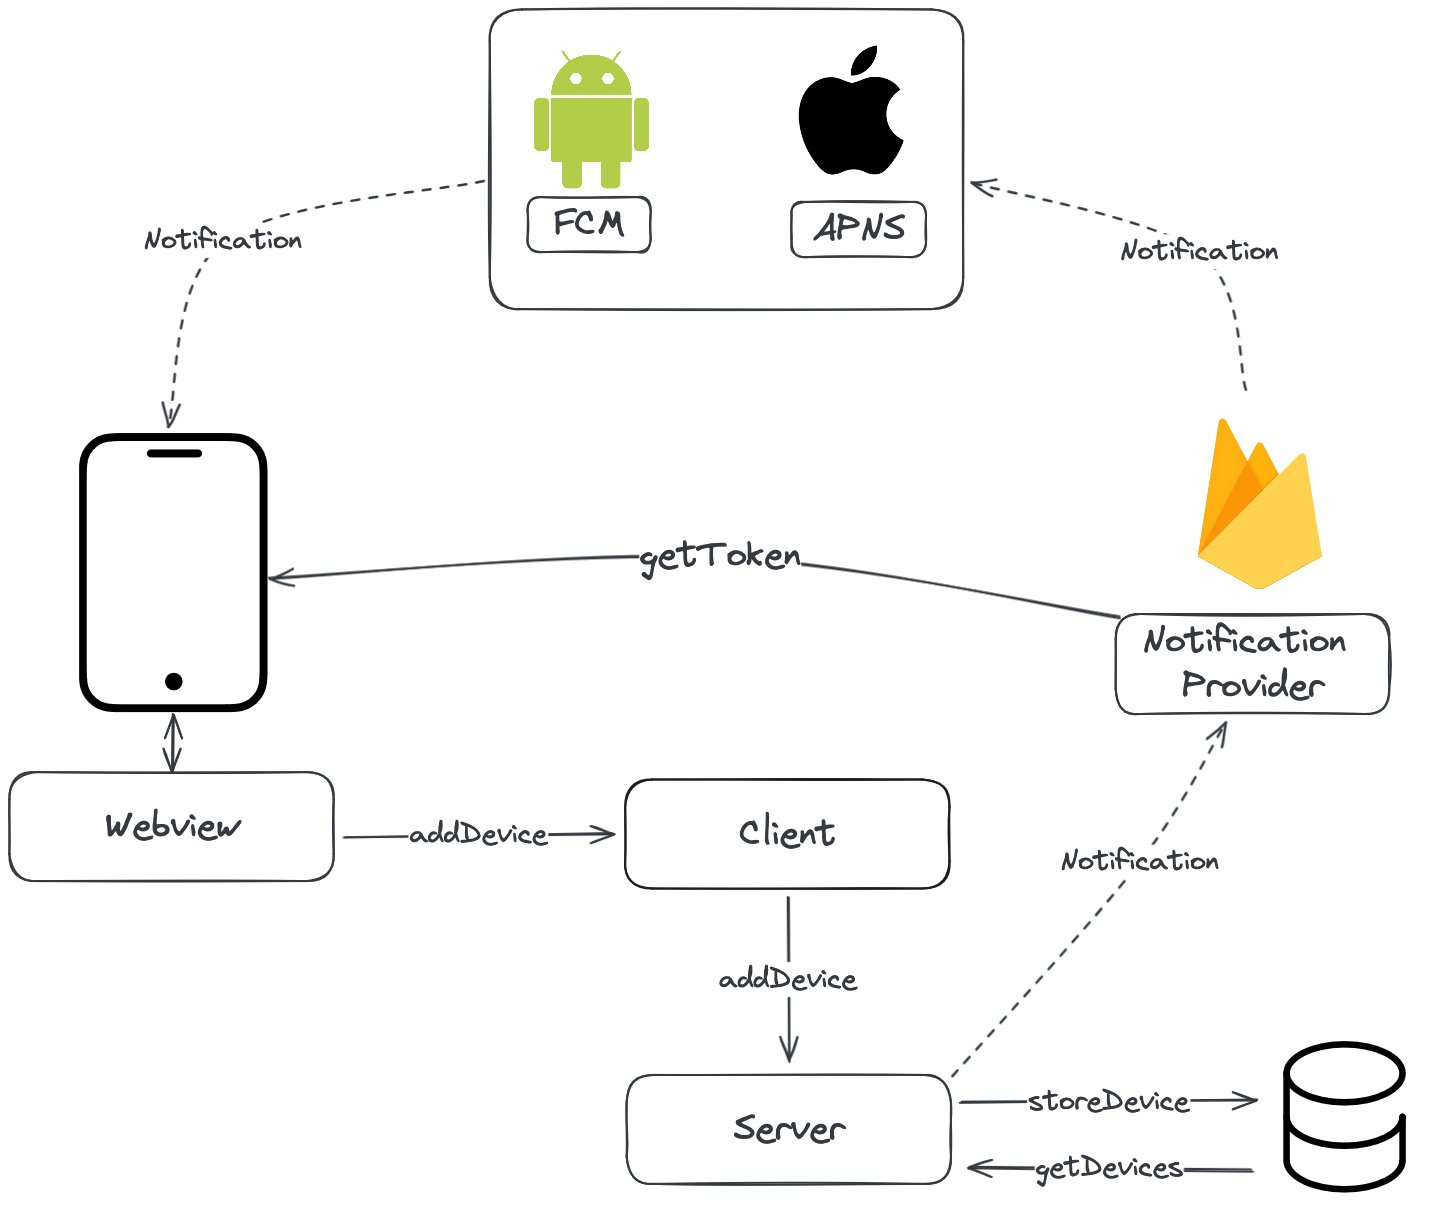
Before starting the implementation of our system, it is important to understand the fundamental concepts of our architecture. The following diagram illustrates the different parts of our system and their interactions. We can distinguish two main steps:
- Registering users and their devices
- Sending notifications
Technical context
To implement this system, we will need four key components:
- A mobile application - React Native with a WebView
- A front-end application - React
- A back-end server - Node.js
- The third-party notification service - Firebase Cloud Messaging (FCM)
If you use frameworks like Next.js for instance, your front-end application and your back-end server can be combined into a single project.
The front-end and back-end applications will be respectively called client and server in the rest of this article for clarity.
We will not detail the setup of these entities, but rather focus on setting up the communication between them.
Configuration of Firebase Cloud Messaging
To start, you need to create a project on Firebase by following the creation guide. Once the project is created, go to the project settings, under the Service Accounts tab and generate a private key in JSON to configure the admin of your notification system. And voila, everything is ready for the next step.
Server Configuration
Firebase Cloud Messaging
For the server side, we will use the firebase-admin package to manage notifications.
npm install firebase-admin
Next, we will initialize the Firebase SDK with the previously generated private key and create functions to send notifications.
// Server: firebase.ts
import admin, { ServiceAccount } from 'firebase-admin'
import { Message } from 'firebase-admin/messaging'
import serviceAccount from 'path/to/serviceAccountKey.json'

// Verify if the Firebase application is already initialized
const firebase = !admin.apps.length
  ? admin.initializeApp({
      credential: admin.credential.cert(serviceAccount as ServiceAccount),
    })
  : admin.app()

const messaging = firebase.messaging()

const addConfig = <T extends Message | MulticastMessage>(message: T): T => ({
  ...message,
  android: {
    notification: {
      icon: 'notification_icon',
    },
  },
  apns: {
    payload: {
      aps: {
        alert: {
          ...message.notification,
        },
      },
    },
  },
})

// Send a notification to a user
export const sendNotification = async (message: Message) => {
  try {
    await messaging.send(addConfig(message))
  } catch (error) {
    console.error('Error sending message:', error)
  }
}
Here, the message parameter contains information about the notification, as well as the user tokens targeted by the notification.
To configure notifications, you can pass additional parameters in the message, such as the title, body, icon, etc. These parameters are platform-specific (Android, iOS, Web). You can find the list of available parameters in the Firebase documentation.
The configuration is mandatory, the configuration above is a minimal example for Android and iOS.
For notifications to multiple users, you must segment the number of recipients into batches of 500 and send notifications multiple times.
// Server: firebase.ts
// Sending a notification to multiple users
export const sendNotificationMulticast = async (message: MulticastMessage) => {
  if (!message.tokens.length) return
  try {
    const tokens = message.tokens
    const tokensArrays = []
    while (tokens.length > 500) {
      tokensArrays.push(tokens.splice(0, 500))
    }
    tokensArrays.push(tokens)

    for (const tokensArray of tokensArrays) {
      const messageBody: MulticastMessage = {
        ...addConfig(message),
        tokens: tokensArray,
      }
      await messaging.sendEachForMulticast(messageBody)
    }
  } catch (error) {
    console.log(error)
  }
}
Data schema
FCM uses a token system to identify users. These tokens are generated by mobile applications and must be sent to the server for storage.
The way these tokens are recorded depends on your application; they are often stored in a database and associated with a user, for example. It is important to set up a system to manage these tokens in order to send notifications to specific users.
In our case, to simplify the example, we will assume that our data structure only contains the Device and User models, which manage user tokens and basic authentication.
A Device is defined by a unique UUID, a Token, and an associated User. Our API allows you to create, read, update, and delete Devices and to log in/out a User.
Client Configuration
The client part will allow us to expose methods on the window interface to manage these Devices from the WebView. We will also add postMessage to communicate with the WebView during a connection or disconnection, which will have the effect of, respectively, registering or deleting a Device using the exposed methods.
// Client: _app.tsx
import React, { useEffect } from 'react'

const App = () => {
  const postMessage = (message: any) => {
    if (window.ReactNativeWebView) {
      window.ReactNativeWebView.postMessage(JSON.stringify(message))
    }
  }

  const onLoggedIn = async () => {
    postMessage({ isLoggedIn: true })
  }

  const onLoggedOut = async () => {
    postMessage({ isLoggedOut: true })
  }

  useEffect(() => {
    // We expose a method to register a Device
    window.registerDevice = async (uuid: string, token: string) => {
      try {
        const response = await fetch('http://localhost:3000/devices', {
          method: 'POST',
          headers: {
            'Content-Type': 'application/json',
          },
          body: JSON.stringify({ uuid, token }),
        })
        if (response.ok) {
          console.log('Device registered')
        }
      } catch (error) {
        console.error('Error registering device:', error)
      }
    }
  }, [])

  return <div>App</div>
}
Why not make the request directly in the WebView? Cookies and headers are not shared between the WebView and the React Native application; it is therefore necessary to go through the application for authenticated requests, for example.
Now that our client is ready, we can now focus on the React Native application.
Mobile Application
Within the mobile application, we will need to handle notifications, their permissions, storage to identify the device, and communication with the WebView.
Firebase Configuration
To use Firebase in a React Native application, you need to install the @react-native-firebase/app package and follow the configuration instructions.
npm install @react-native-firebase/app @react-native-firebase/messaging
npx expo install expo-build-properties
And add the plugin in the app.json configuration.
{
  ...[other properties]
  ios: {
    entitlements: {
      "aps-environment": "production" // ou "development"
    },
  },
  "plugins": [
    "@react-native-firebase/app",
    [
      "expo-build-properties",
      {
        "ios": {
          "useFrameworks": "static"
        }
      }
    ]
  ]
}
Since version 51 of Expo, it is necessary to add the aps-environment authorization for iOS (unless you use expo-notifications which does it automatically).
Permissions
Notifications require permissions to be displayed, so it is necessary to ask the user for them. On iOS, the permission request uses the @react-native-firebase/messaging package. For Android, we will use the PermissionsAndroid class from React Native.
We are going to create a file for each; they will both export the same requestUserPermission method that will ask for the user's permission.
// Mobile: utils/permissions.ios.ts
import messaging from '@react-native-firebase/messaging'

async function requestUserPermission() {
  const authStatus = await messaging().requestPermission()

  const enabled =
    authStatus === messaging.AuthorizationStatus.AUTHORIZED ||
    authStatus === messaging.AuthorizationStatus.PROVISIONAL

  return enabled
}

export default requestUserPermission
// Mobile: utils/permissions.android.ts
import { PermissionsAndroid } from 'react-native'

async function requestUserPermission() {
  const enabled = await PermissionsAndroid.request(
    PermissionsAndroid.PERMISSIONS.POST_NOTIFICATIONS
  )
  return enabled === PermissionsAndroid.RESULTS.GRANTED
}

export default requestUserPermission
Make sure to set the correct file names so that React Native can automatically find them depending on the platform.
Storing Device's unique identifier
To identify a device, we will use the expo-secure-store package to store a unique identifier generated by the application.
npm install expo-secure-store react-native-uuid
// Mobile: utils/device.ts
import * as SecureStore from 'expo-secure-store'
import uuid from 'react-native-uuid'

const getDeviceUUID = async () => {
  let uuidStored = await SecureStore.getItemAsync('notification-device-uuid')
  if (!uuidStored) {
    uuidStored = uuid.v4().toString()
    await SecureStore.setItemAsync('notification-device-uuid', uuidStored)
  }
  return uuidStored
}

export default getDeviceUUID
Firebase Configuration
To configure Firebase, you need to add applications to the Firebase console and follow the instructions for each platform.
For iOS for example, you need to add the GoogleService-Info.plist file at the root of the project and for Android, the google-services.json file. You also need to add the paths in the app.json configuration file.
// Mobile app.json
{
  ...
  "ios": {
    "googleServicesFile": "./GoogleService-Info.plist"
    ...
  },
  "android": {
    "googleServicesFile": "./google-services.json"
    ...
}
}
In the iOS configuration, you need to add a Firebase option in the firebase.json file and add the following parameter:
// Mobile firebase.json
{
  "react-native": {
    "messaging_ios_auto_register_for_remote_messages": true
  }
}
WebView Initialization
We will set up the WebView in our mobile application using the react-native-webview package. We will also add methods for communicating with the client.
npm install react-native-webview
// Mobile: App.tsx
import React, { useEffect, useRef } from 'react'
import WebView, { WebViewMessageEvent } from 'react-native-webview'
import messaging from '@react-native-firebase/messaging'

export default function App() {
  const webViewRef = useRef<WebView>(null)

  const onLoadEnd = async () => {
    // Retrieve the device's unique identifier
    const uuidStored = await getDeviceUUID()

    // Ensure that the user has indeed accepted notifications
    if (await messaging().hasPermission()) {
      messaging()
        .getToken()
        .then((token) => {
          // We send the token to the client through the exposed method
          webViewRef.current?.injectJavaScript(
            `window.registerDevice("${uuidStored}", "${token}");`
          )
        })
        .catch((error) => {
          console.log(error)
        })
    } else {
      // We remove the token linked to the device
      webViewRef.current?.injectJavaScript(`window.registerDevice("${uuidStored}", "");`)
    }
  }

  const onMessage = async (event: WebViewMessageEvent) => {
    try {
      const message = JSON.parse(event.nativeEvent.data)
      let uuidStored = await getDeviceUUID()
      // When logging in, we ask the user's permission and send the token to the client
      if (message.isLogged) {
        if (await requestUserPermission()) {
          messaging()
            .getToken()
            .then((token) => {
              // We send the token to the client through the exposed method
              webViewRef.current?.injectJavaScript(
                `window.registerDevice("${uuidStored}", "${token}");`
              )
            })
        }
      }

      if (message.isLoggedOut) {
        // When logging out, we remove the token linked to the device
        webViewRef.current?.injectJavaScript(`window.registerDevice("${uuidStored}", "");`)
        await messaging().deleteToken()
      }
    } catch (error) {
      console.log(error)
    }
  }

  return (
    <WebView
      ref={webViewRef}
      source={{ uri: 'http://localhost:3000' }}
      onLoadEnd={onLoadEnd}
      onMessage={onMessage}
    />
  )
}
We now have a tracking system for each user's Device tokens.
Receiving Notifications
We still lack the system to receive notifications. For this, we will need to define the behavior for the three states of a mobile application: in the foreground, in the background, and closed.
The notifications received by the mobile application may sometimes contain additional data, such as a pathname, for example, that allows us to redirect the user to a specific page of the WebView.
So, we will maintain a state to store the pathname of the WebView, and modify it if a notification has been opened containing a pathname.
// Mobile: App.tsx
import React, { useEffect, useRef, useState } from 'react'

export default function App() {
  [...]
  // We maintain a state to store the pathname of the WebView
  const [pathname, setPathname] = useState<string | null>('/')

  useEffect(() => {
    // We retrieve the initial notification: application in the foreground
      messaging().getInitialNotification().then(remoteMessage => {
        //When opening the notification, we retrieve the pathname
        if (remoteMessage?.data?.path) {
          setPath(remoteMessage?.data?.path);
        }
      });

      const unsubscribe =
      // We retrieve notifications when the application is in the background
        messaging().onNotificationOpenedApp(remoteMessage => {
          //When opening the notification, we retrieve the pathname
          if (remoteMessage?.data?.path) {
            setPath(remoteMessage?.data?.path);
          }
        })

      // We retrieve notifications when the application is closed
      return unsubscribe;
    }, []);

  return (
    <WebView
      ref={webViewRef}
      source={{ uri: `http://localhost:3000${pathname}` }}
      onLoadEnd={onLoadEnd}
      onMessage={onMessage}
    />
  )
}
We are now ready to receive notifications in our mobile application, regardless of the state of the application.
Now let's finish with sending notifications from the server.
Sending Notifications
To send notifications from the server, we will use the tokens of the Devices to target users.
// Server: index.ts
import { sendNotificationMulticast } from './firebase'

type Device = {
  uuid: string
  token: string
}

type User = {
  id: string
  devices: Device[]
}

// Retrieve the users
const users: User[] = getUsers()

// We extract the tokens of the devices linked to each user
const tokens = users.flatMap((user) => user.devices.map((device) => device.token))

// We send a notification to all users
sendNotificationMulticast({
  tokens,
  notification: {
    title: 'New Notification',
    body: 'You received a new notification',
  },
  data: {
    // When opening the notification, we redirect the user to a specific page
    path: '/home',
  },
})
And there we have it, we are ready to send notifications to our users, of course, always in a reasonable manner.
Be careful not to expose Firebase configuration secrets in the source code, it is better to store them in environment variables.
Deployment
Now that our mobile application depends on features exposed in our web application, make sure that the WebView points to a version containing these features of your web application.
The native push notifications feature is not supported by Expo Go, so it is necessary to build the application with expo build to test notifications.
Alternative
In this article, we used Firebase tools to manage notifications, following a feedback. However, there are other alternatives for managing notifications, including expo-notifications which provides a comprehensive product documentation and may appeal to users familiar with Expo tools.
Conclusion
In this article, we saw how to set up a notification system within a React Native application using a WebView. We saw how to configure Firebase Cloud Messaging, manage permissions, store a unique identifier for devices, communicate between the mobile application and the WebView, and finally send notifications from the server.
Sending notifications becomes child's play with Firebase Cloud Messaging, and communication between the mobile application and the WebView is facilitated by the methods exposed on the window interface. It is also an essential feature to keep your users informed.
If you are interested in this integration, or if you have any questions, do not hesitate to contact us, we would be delighted to help and discuss this topic with you!
