2 août 2024
Creating an Audio Activity Indicator in the Browser

5 minutes reading
During a recent video conferencing app project, I faced the challenge of implementing audio activity detection on participants' thumbnails. A rather common feature. But during my research, I found that resources on this topic were quite scarce. That's why I decided to share my experience with you.
In this article, we will explore how to detect a participant's audio activity using a MediaStream and the browser's Web Audio API.

Audio in the Browser
To develop this feature, we will need a MediaStream (representing the participant's stream) and the browser's Web Audio API (to extract information from this stream). For those not familiar with these concepts, here's a quick overview.
MediaStream
A MediaStream is like a live multimedia data stream. Imagine it as a pipe through which the sound and/or video from your microphone or camera pass. If you're wondering how to obtain one, I recommend this article.
In this article, we assume you have successfully obtained a MediaStream to analyze. What interests us in this stream are the audio tracks.
Web Audio API & AnalyserNode
The Web Audio API is a powerful set of tools provided by the browser to manipulate and analyze sounds. This API is generally well-supported by browsers. Among these tools, we will focus on the analyzer (AnalyserNode). It's like a sophisticated device that gives us the characteristics and detailed information of a sound in real-time. This analyzer, once connected to a MediaStream, will provide us with the information we're looking for at a given moment.
Analyze What?
To detect a participant's audio activity, we need a function that, at regular intervals, can tell us whether an audio stream is active or not.
To do this, we will use the concept of a threshold.
We will define a threshold value representing an intensity above which we consider our audio signal to be active. Below this threshold, we consider it inactive.
This threshold is a parameter that can be adjusted through usage (depending on background noise, microphone quality, etc.).
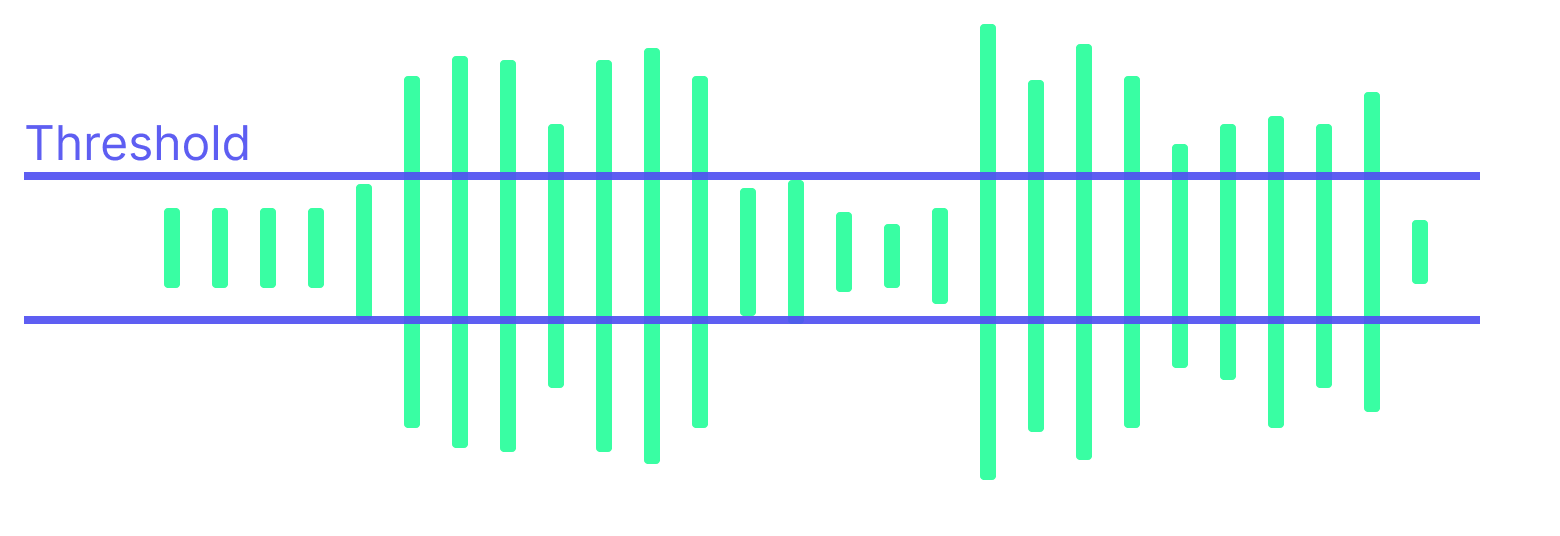
Through an AnalyzerNode, we can copy the intensity of several frequency bins of an audio signal at a given moment. With a simple average calculation, we can deduce a global intensity and compare it to our threshold value.
This translates to the following function:
/**
 * Check if the audio level is exceeding the threshold
 */
export function isAudioLevelExceedingThreshold({
  threshold,
  analyser,
}: {
  threshold: number
  analyser: AnalyserNode
}) {
  const dataArray = new Uint8Array(analyser.frequencyBinCount)
  analyser.getByteFrequencyData(dataArray)

  const average = dataArray.reduce((sum, value) => sum + value, 0) / dataArray.length
  const normalizedValue = average / 255

  return normalizedValue > threshold
}
The Web Audio API uses 8-bit frequency values. This means each value in the dataArray is an
integer between 0 and 255. Our average value is thus an integer between 0 and 255. We normalize
this value to bring it to a range between 0 and 1 (0 representing absolute silence and 1 the
maximum possible intensity).
At regular intervals, we will need to call the isAudioLevelExceedingThreshold function and then, depending on its return value (true or false), perform an action.
/**
 * Check if the audio level is exceeding the threshold,
 * and call the appropriate callback
 */
export function checkAudioLevel({
  threshold,
  analyser,
  onExceedThreshold,
  onBelowThreshold,
}: {
  threshold: number
  analyser: AnalyserNode
  onExceedThreshold: () => void
  onBelowThreshold: () => void
}) {
  if (isAudioLevelExceedingThreshold({ threshold, analyser })) {
    onExceedThreshold()
  } else {
    onBelowThreshold()
  }
}
That's it for the logic part of our audio activity indicator. Now, let's integrate it into our application.
Integration in React
Here, I will show you how to integrate this logic into a React component.
To do this, I will isolate the logic in a custom hook useAudioActivityIndicator which will take mediaStream, a threshold value, and an interval value (representing the time interval between checks) as parameters.
This hook will manage the creation of the AudioContext, the AnalyserNode, and start the audio activity checks at regular intervals.
It will return a state isExceedingThreshold which will be true if audio activity is detected, and false otherwise.
import { useEffect, useRef, useState } from 'react'
import { checkAudioLevel } from './utils'

interface AudioLevelDetectorOptions {
  threshold?: number // a number between 0 and 1, where 1 represents the maximum audio level and 0 represents the minimum audio level
  interval?: number
}

const useAudioLevelDetector = (
  mediaStream: MediaStream | null,
  options: AudioLevelDetectorOptions = {}
): boolean => {
  const [isExceedingThreshold, setIsExceedingThreshold] = useState(false)
  const audioContextRef = useRef<AudioContext | null>(null)
  const analyserRef = useRef<AnalyserNode | null>(null)
  const timeoutIdRef = useRef<number | null>(null)

  const threshold = options.threshold || 0.1
  const interval = options.interval || 100

  function onInterval() {
    if (!analyserRef.current) return
    checkAudioLevel({
      threshold,
      analyser: analyserRef.current!,
      onExceedThreshold: () => {
        setIsExceedingThreshold(true)
      },
      onBelowThreshold: () => {
        setIsExceedingThreshold(false)
      },
    })
  }

  function onCleanUp() {
    if (timeoutIdRef.current) {
      clearTimeout(timeoutIdRef.current)
    }
    if (audioContextRef.current && audioContextRef.current.state !== 'closed') {
      // Close the audio context if it is not closed
      audioContextRef.current.close()
    }
    audioContextRef.current = null
    analyserRef.current = null
  }

  useEffect(() => {
    if (!mediaStream || !mediaStream.getAudioTracks().length) {
      setIsExceedingThreshold(false)
      return
    }

    if (!audioContextRef.current) {
      audioContextRef.current = new (window.AudioContext || (window as any).webkitAudioContext)() // Create an AudioContext, or a webkitAudioContext for Safari
    }

    if (!analyserRef.current) {
      analyserRef.current = audioContextRef.current.createAnalyser() // Create an AnalyserNode
    }

    const source = audioContextRef.current.createMediaStreamSource(mediaStream) // Add the media stream to the audio context
    source.connect(analyserRef.current) // Connect the source to the analyser

    timeoutIdRef.current = window.setInterval(onInterval, interval)
    onInterval()

    return () => {
      onCleanUp()
    }
  }, [mediaStream, threshold, interval])

  return isExceedingThreshold
}

export default useAudioLevelDetector
Now, we just need to use this hook in our React component and apply the style of your choice when the threshold is exceeded.
In the following example, I chose to display white borders on the active thumbnail.
The <AudioActivityIndicator> component handles this.
Github repository of the example
You can, of course, customize the style and even modify the overall behavior of the audio activity indicator to suit your needs. For instance, instead of treating audio activity in a binary manner (active or inactive), you might consider varying the intensity of the indicator based on the audio signal's intensity. In that case, you'd use a range of intensities rather than a single threshold value.
It's more visually pleasing to have a reactive and instant animation when switching from inactive → active, and conversely, animate with a small delay and more gradually in the reverse transition.
The Web Audio API is a powerful tool that allows you to manipulate and analyze sounds within the browser. In this article, we have barely scratched the surface by focusing on audio activity detection. But, if you wish to dive deeper, much more can be done with this API. I recommend this article on how to play music in your browser using the Web Audio API, or you can check out the official documentation to learn more about it.